The first view of this App after installing this App is shown below. If it can recognize the country or region of your OS, it will change words automatically to your language. The supported language at this moment is English and Chinese.
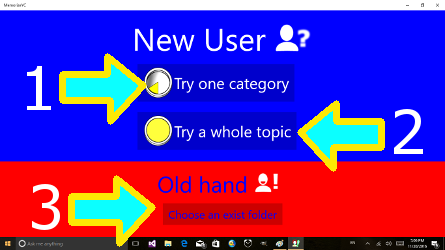
- Clicking this button, it will change to the view of . At that page, it will ask you to provide it a name of your container and make that name a folder in your selected folder. Then, it will copy a sub-folder named Shape and color into that container. If you check them in the File explorer, you will find that they are just image or text files and folders and this App will make them an interactive game.
- Clicking this button, it will change to the view of . It works like the previous one except that it will copy a complete sample container into your selected folder. That sample is the collection of some basic syntaxes of Cortana. Well, the tutorial of Cortana built in Windows 10 is good enough. Try to use it and it will make you get well with Cortana. ^_^
- If you have known how to make a folder and files as the contents for this App, you can click this button and choose a container folder from windows folder picker. Oh, click this button, it will change the view to the .
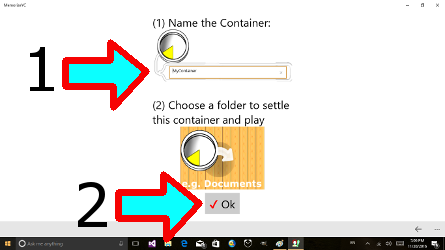
- Input your desired name of a container into this text box.
- Clicking this button will launch a windows folder picker for you. Once you select a folder, this App will create a sub-folder named above and copy a demo category folder named Shape and color into that container for you to play.
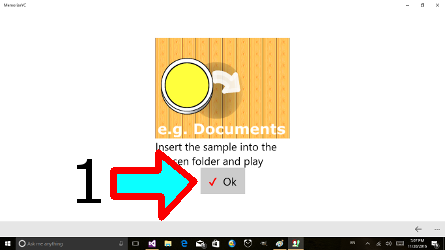
- After clicking this button, it will lanuch windows' folder picker for you to select an exist folder such as c:/Documents and copy a whole demo container into your selected folder. That demo container is for the syntaxes of Cortana. Enjoy it.
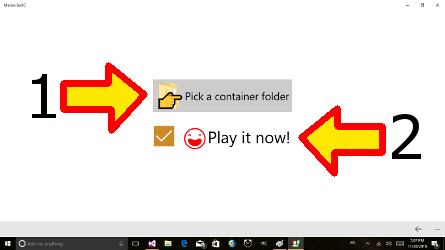
- Once you click this button, a windows' folder picker will be shown for you to pick up a folder as a container.
- Checking it means that it will navigate you to the ; otherwise, it will navigate you to the 。
Everytime you use this App, the first page you will see is shown below. This page consists of 8 parts.
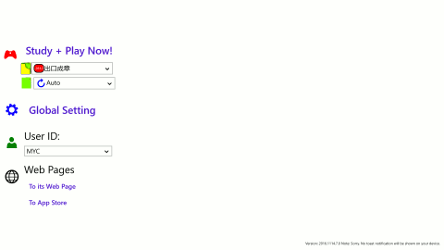
- Clicking this button will navigate you to the . However, which category will be used for the play page? You can choose them in the comboBoxes (2) and (3).
-
You can choose one Container from this comboBox. By the way, the available containers is set in the of Global Settings.
Besides, if there is a red circle before the name of a container, it means that it is out of date and the number inside the red circle denotes how many days overdue. -
The first item of this comboBo is Auto which means that you hope this App can help you to choose one category for you; otherwise, it will just play the category selected by you in this comboBox.
Similarly, there might be a red or blue circle before the name of each category. Those circles and numbers have the same meaning as the one in the comboBox marked by (2). - Clicking this button will navigate you to the. At that page, you can set up some parameters for the whole App.
- By default, there is a user named MYC which is the default user. If you want to add in a new user ID, you can do it in the of Global Setting Page. This App will store each user's information of playing each category.
- Clicking this button will navigate you to the Main Web Page of this APP; if you want to test the Web version of this App, you can taste it through this demo page. Its usage is similar to WinAPP; however, you cannot edit cards and folders in Web version because of security issue.
- Clicking this button will guide you to the web page of this App in Windows Store; you will see the brief information for the newest version. Through it, you can download this App for Windows 8.1, Windows Phone 8.1 and Windows 10. If you want the source code of this App's web version, please download it from its Github's web page.
- Show the current version installed in your device.
The figure below is the view of this Page. It has 6 sub-pages.

- Clicking this triple horizontal lines' button will toggle the visibility of settings' names.
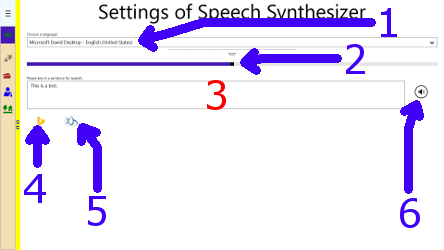
- Clicking this button will navigate you to . At that page, you can test the speech synthesis and the language set there will be the default language for speech synthesis used in this App. Remember that, you can set different language for different category in the since the user might want to study multiple languages.
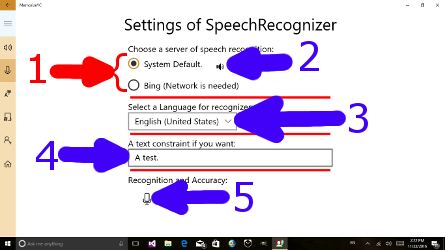
- Clicking this button will navigate you to . Typically, there are two kinds of engines for you: the one built in Windows and Bing; however, Bing might not work after 2017/03/01. So, forget that one.
- Clicking this button will navigate you to . Because the texts of each page can be set in this page, I let the language of this page always be English to avoid that the user cannot find this page to set texts back to default value.
- Clicking this button will navigate you to . You can manipulate containers and categories in this page and this page will be used frequently.
- Clicking this button will navigate you to the . Here you can add and delete User IDs. Different user will have different USER.level file in each category folder. By this file, this App can get the information about language, level, etc. for the specific user.
- Clicking this button will navigate you back to ; however, the list on the left hand side will still be there.
-
This is a dropdown list that you can select the language for speech synthesizeer. About the available languages, you can install them through
Action center All Settings Time & language region & language Add a languagein Windows 10. to toggle the visibility of the illustration.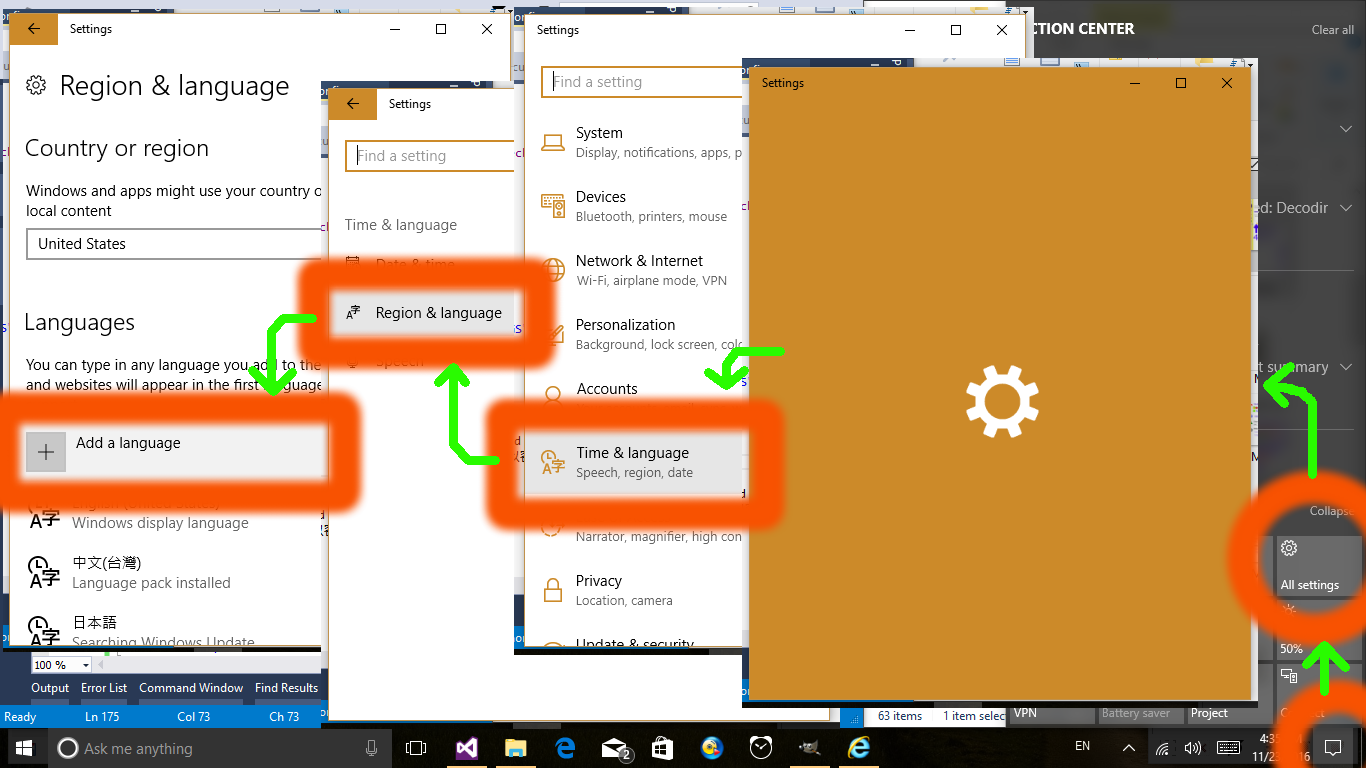
- This slider is used to change the pace of speech. It is useful when you are studying foreign languages.
- The texts for testing of this speech synthesis.
- Clicking this button will launch your browser to show the page of bing translator.
- Clicking this button will launch your browser to show the web page of the free dictionary .
- Clicking this button will start the speech synthesis.
- By default, there are two kinds of Speech recognition engines in this App. One is system default and the other one is from the service of Bing. However, the service from Bing might be cancelled at 2017/03/01, you have better to use the system default one.
- This switch will toggle whether dictate the answer again after the recognition.
-
A dropdown list for choosing a language for speech recognition. You can install available languages through
Action center All settings Time & Language region & language Add a languagein windows 10. Typically, the country which can use Cortana can support the language for speech recognition. can toggle the visibility of the illustration.
- One interesting part of Windows speech recognition is that you can provide it a restricting sentence. Quite easy for us to use. If you did not provide any words in this text box, it would show you the result without any restriction.
- Clicking this button to start the recognition.
Because the texts used by pages are stored as .json files in Roaming Folder, the user can change texts by changing texts in these .json files. This App provide this page to simplify this step. You can output them into just only one .json file named Resources.json and this file can be imported by the other user and he/she can get the same texts as yours.
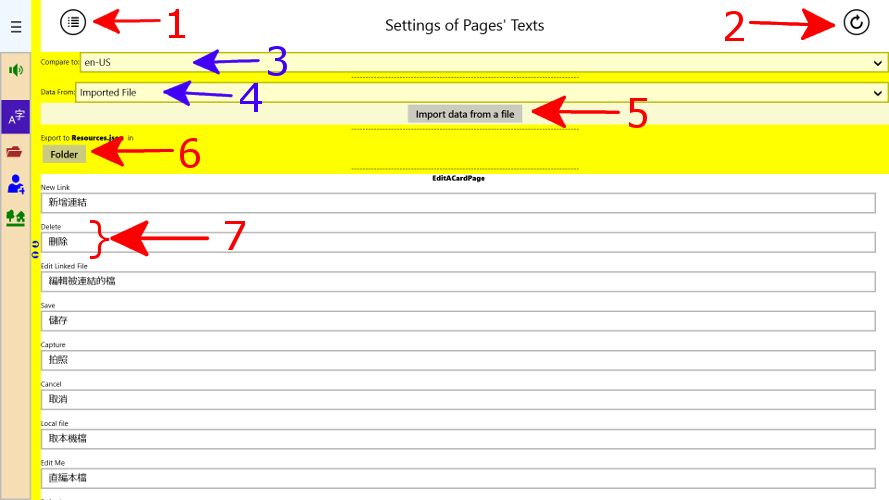
- Clicking this button to toggle the visibility of the yellow region in which the elements (3) to (6) are.
- After any modifycation, don't forget to refresh all the texts by clicking this button. Clicking this button will store the texts shown in the 2nd element of (7) into json files so that you can see the new texts next time you use this App.
- The 1st elements of (7) is decided by this dropdown list. Just for comparison and it has no impact the texts of pages.
-
The 2nd elements of (7) will be changed when you change the selected item in this dropdown list. In this figure the selected item is Imported File and it means that you can change texts by importing a json file. The benefit is that you can just use the texts exported by someone so that you don't need to modify them all by yourself.
By the way, the service of Bing Translator might be stopped at 2017/03/01. I still have no idea how to overcome this problem. - You can import a .json by clicking this button and this json file can be generated by clicking the button (6).
- Clicking this button will export the texts of the 2nd elements in (7) into the file Resources.json. Before that, it will ask you to select a folder to hold this file.
- The 1st one is for comparison and the 2nd one is for new texts. Once you finish your modification for the 2nd elements of (7), you can store them into this App and this App will show you all the pages with these new texts.
This page has two main functions. They are
and
.
The figure below is the view of downloading a container from network.

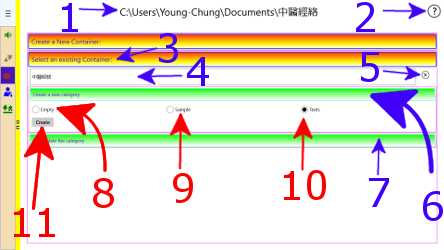
- If you have no idea of the meaning of a container and a category, clicking this button will navigate you to another page which will show you about their meanings. A folder which have image or texts files which are categorized and put into sub-folders can be a container and be used by this App as a study material.
- Clicking this bar to switch to the block of Create a new container.
-
Your input text will be the name of your desired folder (container) name; however, you still have 2nd choice that you can input a http address of a container on the web site. For example, you can input http://MemorizeYC.AzureWebsites.net/Static/Samples/中醫經絡 to download the container 中醫經絡. First of all, it will try to recognize whether the web site you selected is a container. If it is, this App will download the whole container to your selected folder as shown above.
The URLs shown below are the samples that you can download from your Windows App as long as copy one of it and paste it into your Windows App's textbox for a new container.
- Clicking this button to choose a folder to hold the container folder. By the way, after inputting the container's name in (3) and then click Enter key will launch this folder picker, too.
- Tapping this bar will switch to show the block of .
In this block, there are two main modes, too. The first one is , the other one is which is the default one.
Because parts of these two modes are the same, let me describe them at once.
 let me describe its elements from the 8th one.
 Because the first 7 elements have been described, let me describe from the 8th one here.
Because parts of these two modes are the same, let me describe them at once.
- Shows the name of the selected container.
- If you have no idea about the meaning of a container and a category, you can click this button to see its explaination.
- Clicking this bar will switch to show this block for an exist container.
- You can select an exist container from this dropdown list. You also can choose a folder as a container in this dropdown list.
- Clicking this button can remove a container or all containers from the above list. Don't worry, it will just remove them from the list of this App, the folders is still in your file system. You can include them back into the list any time.
- Clicking this button will switch to show the block of creating a new category.
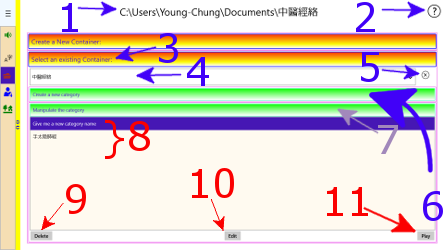
- Clicking this button will switch to show the block of manipulating a category.
let me describe its elements from the 8th one.
- Once you select this one and then click the button (11), it will create a new sub-folder(category) for you in this container.
- Once you select this one and then click the button (11), this App will copy a category named Shape and color into your selected folder.
-
Once you select this one and then click the button (11), this App will show you a window for creating a category from a text file or texts directly.
can toggle the visibility of this illustration.
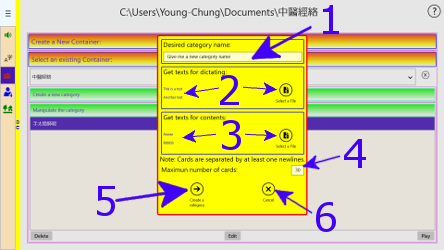
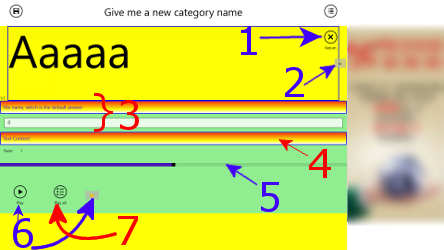
- First of all, provide it the name of your desidered category name.
- Then, input sentences for the answers. You can click the button on the right hand side to input those answers from a text file or just input those sentences directly into the text box shown by clicking the area pointed by the arrow.
Remember that, each sentence is separated by at least one empty new line and this App will automatically create text files for each sentence. - Next, you need to input cards' text contents. The actions are similar to the previous one. One more thing, if you provide this App the text contents, the number of contents should be the same as the one of answers.
- Because it is not a good idea to put too many cards inside a category, you can set the maximum number of cards in this text box.
- Then, you can click this button (5) to generate a category for these texts.
- Finally, if you want to stop to create this new category, you can click this button to achieve what you want.
- Once you click this button, this App will start to create a new category.
Because the first 7 elements have been described, let me describe from the 8th one here.
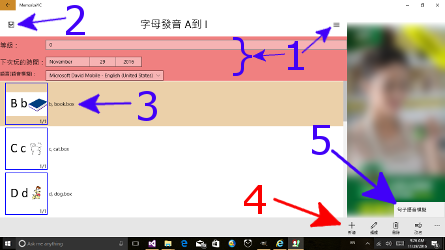
- In this list view you will see the list of all categories of the selected container. Because buttons (9) to (11) is for each category folder, those buttons can be shown only when a category is selected.
- Delete a selected sub-folder(category). Be careful, the sub-folder will be deleted and they will be no longer in the folder of your selected container.
It has three main functions: select, create and delete a user ID. By the way, you can select a user ID in, too. The main purpose of user ID is for the users can have their own study record on the same device.
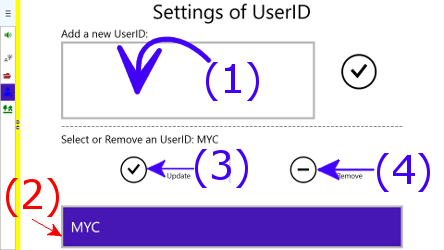
- The input in this text box will be the new user ID. Clicking the button on its right hand side will add a new user ID.
- Select an exist user ID from this dropdown list.
- Clicking this button to change the user.
- This App will remove the selected user ID from its list after clicking this button, but don't worry, the record of that removed user is still in each category folder. If you want to activate that user again, adding his/her user ID again is enough.
Before you get into this page, you might see a video Adv. Basically, it will show up when more than 10 minutes you have played. So, this video Adv. behaves as a periodic timer but it will not interrupt you when you are studying.
Otherwise, you'll see this page as shown below.

Otherwise, you'll see this page as shown below.
- Toggle the visibility of 。
- For each card, the action of single tap has different meaning in different meaning so that let me describe them in each mode, and the action of double taps will open .
-
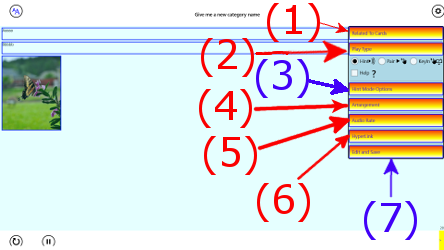
It has three modes, they are、 and .
This bar will be different in different modes. You can switch modes by
- Choosing desired mode in the 2nd block of.
- Clicking the yellow vertical bars at this bar's left and right edges.
- Flip this bar to left or right by your finger.
Each bar has one block, tapping the bar will switch to show the block just under it and hide all other blocks. By the way, the bars pointed by blue arrows are just shown under Hint mode, which is also the edit mode. Your editing will be stored infile.
-
Settings for all cards:
-
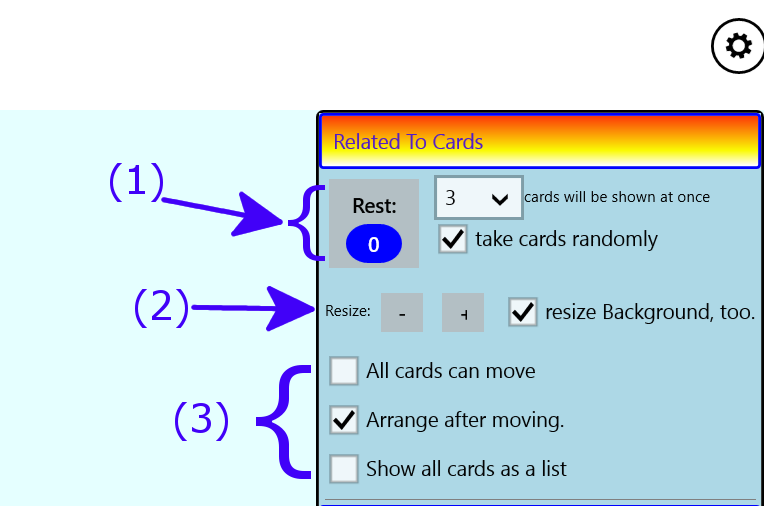
This part consists of one button, a number dropdown list and a check box. You can decide which cards will be shown.
The number inside the blue circle is the number of rest cards which are not shown. This App will try to show cards whose number is the same as the number selected in the dropdown list when you click this button. If the check box is checked, this App will pick cards from the rest cards randomly. -
This part,consists of 2 buttons and one check box, is for resizing cards or the font size of text card's content.
If the check box is checked, the background image will be resized, too. By the way, you can set the path of background in block (7):Edit and Save. - This part, consists of 3 check boxes, is related to the arrangement and movement of cards, by default you cannot move cards. Once you check the 1st check box, you can move cards; check the 2nd check box will force cards to arrange after moving; check the 3rd check box will make cards arrange like a list of legal provisions.
-
This part consists of one button, a number dropdown list and a check box. You can decide which cards will be shown.
-
Game modes:
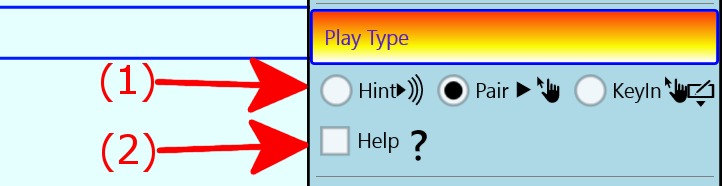
- They are , and , respectively.
- Most elements of this Play Page will pop a Flyout to tell you how to use the element you tap after checking this check box.
-
Extra options for Hint mode:
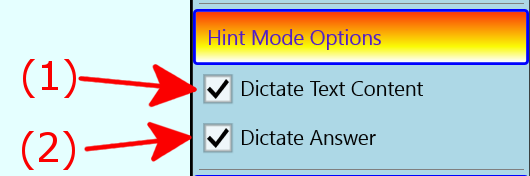 This block just can be shown in Hint mode.
- This App will dictate the content of a text file if this check box is checked.
- Default. If you tap a card, this App will dictate the selected card's voice information. Originally, the voice information is the speech synthesis of the selected card's file name. If there is a audio file bound to this card (one method: make the audio's file name the same as the card's), this App will play that audio file. Or you can declare a property named Dictate in, this App will play the speech synthesis of this property's value. Don't worry. You don't need to edit that json file by yourself, you can declare it in the .
-
Arrange cards:
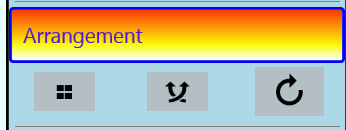 These three buttons are Arrangement, Random Arrangement and Refresh in succession.
-
Speech Ratio:
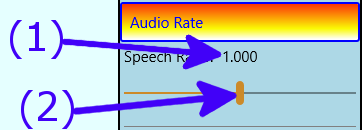
- Show how many times the current speech ratio is more than the original one.
- Change the speech ratio.
-
Hyperlink:
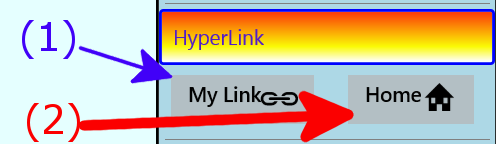
- If this category has a link, clicking this button will launch a web browser with its link. By the way, you can set this link in block (7)Edit and Save:.
- Clicking this button will navigate you back to the .
-
Edit and Save:
This block is just shown in Hint mode.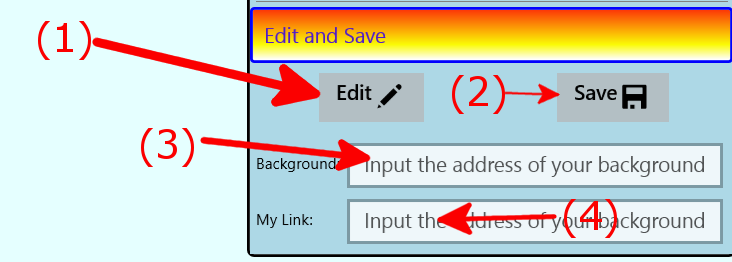
- Clicking this button will navigate you to the 。
- Clicking this button will save all your modifications into file so that you can see what you see now in next play.
- You can input an image's local path or address on the network which can be found through Bing Image, then this image will become the background of this category.
- Similar to the one of background. Clicking the button in block(6) can link to this address.
When we (1)double tap a card, the (2)window for extar information & settings of a card will pop up. You can see this window in all modes but the complete one is just shown in Hint mode. After modifying, don't forget to save it through the block (7) ofto save your modification into file!
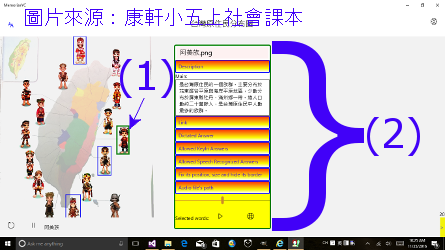 There are 10 blocks in this window:
There are 10 blocks in this window:
File name.
-
Description:
Of course you can declare this property in file directly, but the easier way is declaring it here directly. What you'll see is shown below: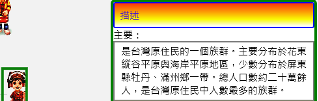 By the way, if the card is a
 .boxfile, you can provide it an extra description for each sub-card. What you'll see is shown below: How to declare the description for each sub-card in a .box file? Please read.
-
Link:
As long as the text box has an address, clicking the button in its right hand side will open a link to that address. By the way, the main link is editable and you can edit it in directly. If the selected card is a.boxfile, you can see extra link for its sub-card. What you'll see is shown below: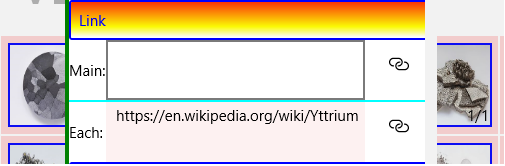 From thisyou'll see how to declare a link for each sub-card.
-
Dictated Answer:
By default, this value is the file name of the selected card; however, if it has been declared in file, or the user type in a sentence in this text box, the texts for speech synthesis will be changed to this value instead of the file name.
-
Allowed KeyIn Answer:
Owing to the number of a card's answer might not be one, the user can input more than one KeyIn answers here. For example, we may want Na and Sodium are both the KeyIn answers but we still want this App to dictate it as 11, Na, Sodium, Alkali metal. If no input here, its default value is the value of Dictated Answer part.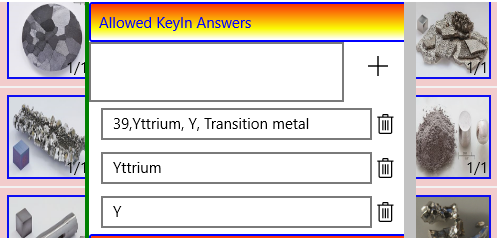 Clicking the button + will add the text in the text box into the KeyIn answer's list.
-
Allowed Answers for Speech Recognition:
The usage of this part is similar to the previous one. The difference is that this is used for speech recognition. For example, we might want the speech recognizer to recognize the letter of Na,which will be dictated as the cry of a goat, one by one.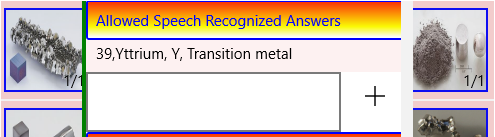
-
Position, size and border:
If you want to resize or move cards, you can achieve that by using your fingers or mouse+wheel! This part is used to toggle whether you want it to set the properties of file for position and size of a card.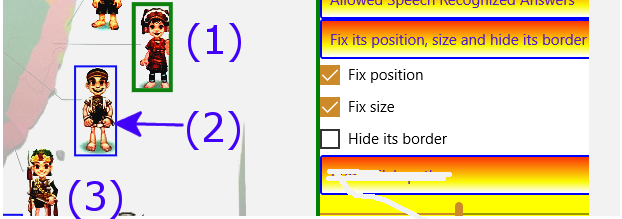 The one marked by (1) is the selected card, the one marked by (2) is the case of the border unhidden and the one marked by (3) is the case of hidden border.
-
Path of audio file:
You can provide it the local path of your audio file or an address on the network. You can test it by clicking the play button on its right hand side to test it.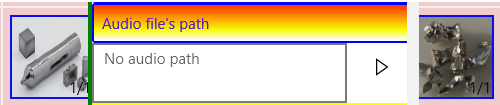
-
Change the speech ratio.
-
The speech synthesis or search of the selected texts:
Typically, all the texts which can be selected in this window can be played or searched by clicking the buttons. The left button is for playing and the right one is for searching on bing translator and the speech ratio can be set in the above slider. One more thing, the speech synthesizer might dictate all texts in some blocks such as Description or Text contents when no text is selected.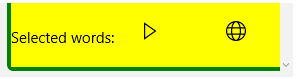
-
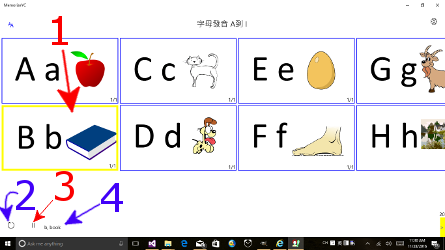
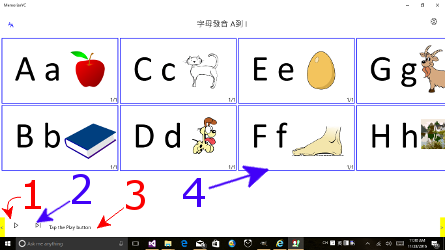
First of all, tapping a card to select it. Once a card is selected, that card will blink and this App will dictate its answer and show its answer in the text box below. If the selected card is a text file, you can ask this App to dictate its content by checking the check box in the 3rd block of Extra options for Hint mode of.
By the way, you can select a suitable language for speech synthesis from the dropdown list toggled by the top-left corner. How to install languages? Please read the section of. - Or, you can ask this App to dictate all cards in succession from the tapped card by clicking this button.
- If you want to pause the dictating, you can click this button to do so.
- The answer of dictated card will be shown in this text box.
-
At the onset of this page, the action of this button is to dictate one of the answer of cards for pairing and is the same as the button (2). Otherwise, the action of this button is to dictate the answer again and again. By the way, this App might play an audio file which is related to the selected card.
Besides, you can choose a suitable language from the dropdown list, toggled by clicking the top-left corner button, for speech synthesis. How to install languages? Please read the section of. - This App will select another card and dictate its answer. Why do we need this button? In some occations that we might forget which card is associated to the answer so that we want to change to the other one.
- The answer of the card selected by this App will be shown in this text box. Tapping this box will toggle the visibility of this box because sometimes we don't want to see the answer.
- If the card you tapped is the correct one, that card will be annihilated. Once all the cards are annihilated, you pass the game or finish one study. Remember that, the action of double tap will pop a window for extra information & settings of a card.
- First, you need to tap a card to select it.
-
There are two ways to input the answer. The first way is by dictating the answer by yourself and it will be recognized by the speech recognizer activated by clicking the button (3); the second way is by keying in answer in the text box (4) below.
By the way, you can select a suitable language from the dropdown list, toggled by clicking the top-left corner, for the speech recognition. How to install languages? You can get some ideas from the section of. - As above.
- As above.
- Clicking this button will send out the answer. If the answer is correct, the selected card will be annihilated; otherwise, you will pay some points. Once all cards are annihilated, you pass the game or finish a study.
- Clicking this button to toggle the visibility of the window for
.levelfile. In this window, you can set its level, due date and choose a suitable language for speech synthesis. - Clicking this button will save your modification into
.levelfile. - The content of a card and its file name will be shown on the left hand side and right hand side, respectively.
- In this application bar there are 4 main buttons and 1 sub-button (5). By these 4 main buttons you can create a card,, delete the selected card and modify the selected card's file name.
-
Clicking this button, a window will pop up as shown below in which the cards can be shown as a slide.
- Close this window.
- Switch to next card.
- Clicking this bar, you will see the decoded file name. Remember that, this value is not gotten from MYCategory.json.
- If the card is a text file, this bar and related block will be shown. Clicking this bar can toggle the visibility of this block.
- Changing the ratio of dictating.
- Clicking these buttons can play or search the selected texts. If no text is selected, the selected texts will be the whole sentences in text boxes in (3) or (4).
- Clicking this button will dictate all cards' answers one by one.
If you create a new card through the and you did not declare its extention, this App will make that card as a .box file. Then this App will show you an initial window before the page shown below. Besides, if you edit an exist card, this App will navigate you to this page, too. So, I just show the page for .box file. However, the edit a card page for an image can allow you to capture a picture from your device's camera.
 There are three main parts:
There are three main parts:
-
Editing a card's file name:
You can modify the card's file name directly in this text box. Remember that, don't change its extension or this App will ignore your modification. -
Editing file's content:
- Copyed from other file directly. This button is almost useless for .box file, but it is useful for image and text files.
- Because .box file is just a text file in which it will declare sub-cards associated to this card, you can edit this .box file as a text file directly. Its syntaxes can be found in the section of.
-
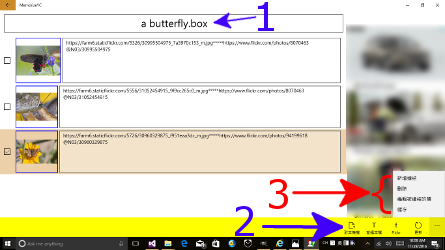
Clicking this button will pop up a window in which you can search images from Flickr directly:
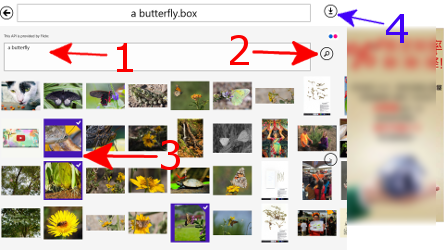 First of all, (1) the file's file name will be in the text box automatically for searching, (2) you just need to click the button to search images from Flickr, (3) you can select images by tapping them, if you did not find suitable image, you can click the button > to find other images, (4) Clicking this download button(just its hyperlink) to catch those images' links. The first illustration of this section is the screen after clicking this download button.
- Sometimes you need to click this button to refresh this window's view because sometimes you might modify each link in each text box shown in the 1st illustration of this section.
-
Editing the linked content or file and Saving your modification:
-
Add a link associated to local file:
In fact, once you click this 1st button, this App will pop up a text box for you to input a file path to which you want to link and then show you the window shown below. How to declare this local file's path? You can read the section of. Besides, this window will be a little different for different file type.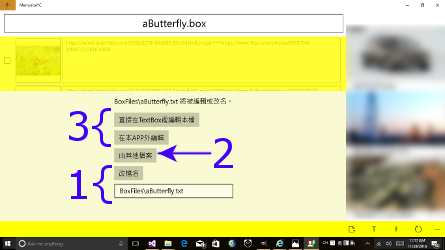
- If you want to modify the file name, you can make it by inputing its file path in the text box and then clicking the button. Remember that, if there is no file associated to your input file path, it would create those folders and file for you.
- The file associated to this file path can be copied from other files.
- Because the user may want to use the other Apps to edit the linked file, such as Paint or Notepad, the user can edit it by the other App or just by a text box.
-
Delete a link:
Clicking this button can just remove the link or even delete the linked file. -
Editing linked file:
If the linked file's path is on the web, this App will download it; otherwise, this App will edit it. -
Saving:
Clicking this button before you leave from this page is better for you because your modification may not be saved.
-
Add a link associated to local file:
Do you remember how your teachers taught you about letters? They would made some flash cards and stuck them on the board. (1) They would show each letter and dictate it to let us had an impression for those letters; (2) then they would dictate one letter and ask us which card is related to; once we knew the letters more, (3) they would try to ask us to dictate each letter on the card. By the way, (4) they would try to make us familiar with those letters by homeworks, examings, etc.
Well, on the stance of a learner, the first three points are the three modes of this APP's game mode and the role of your device is the instructor; then, it will remind you to review your study based on Ebbinghaus Forgetting curve in order to make your memory to be a long-term one.
On the stance of a instructor, what are the cards? As long as you put some text or image files into a single folder, those files will be flash cards in this APP and their file names will be their answers by default.
For example, you may teach a lesson about animals in which insects, reptiles and mammals are introduced. Now, you just need to create a folder named Animals in your folder Documents and create sub-folders Insects, Reptiles and Mammals in the folder Animals. Then you can ask your students to collect or draw the pictures of these animals for you and put these files into each sub-folders based on their class. Now, you can make this folder Animals a container for this App by involving it through this App's and play it.
If you want to position cards, such as rain forest animals, at specific positions with specific sizes, and you want to set an image, such as jungle, as the background of a category, you can do it in the. Don't forget to save your modification, then the cards and the background will position at correct sites next time you play it.
If you want to let other people can play the container you just made on line directly, you need to download web version of MemorizeYC from http://github.com/ychsue/MemorizeYC.Web. After involving this javascript code and copying this container into your web site and do a little modification, people can your container on line. You can see the demo at http://MemorizeYC.AzureWebsites.net/Static.
Basically, the protocol for image and text files on line is http usually. So, if the path is recognized as a web path, this App will try to load the files from network. Otherwise, this App will try to load the files from your device. However, this path is slightly different to the ordinary file path.
Because all local links are asked by one category, the declared path is related to the folder path of the category if the declared path is not started from / or \; otherwise, the declared path is related to its container's folder path. By the way, if one folder or file does not exist, this App will create one for you by default.
For example, if a category's folder is
D:/CONTAINER/CATEGORY and the declared path is a/b/c.txt, the true file path of this declared path will be D:/CONTAINER/CATEGORY/a/b/c.txt. If some of folders or the file are not there, this App will create them for you. If your desired path is /a/b/c.txt, its true file path will be D:/CONTAINER/a/b/c.txt.
Remember that, this file is indeed a text file and its content is shown below
 First of all, if there are more than one row in a .box file, each row is associated to one sub-card.
From this illustration you can see three blocks separated by five * and five + . The first block is associated to a desired path which obeys the rule described in and the other two blocks are just optional.
First of all, if there are more than one row in a .box file, each row is associated to one sub-card.
From this illustration you can see three blocks separated by five * and five + . The first block is associated to a desired path which obeys the rule described in and the other two blocks are just optional.
- *****
The link after this five * is the local link for this sub-card, which can be seen when the user double tapped this card in Play Page. The main purpose of this link is to tell people the source of this image for license issue. For example, all the images linked from Flickr will have this value. - +++++
The link after this five + is the local description. At this moment, this App just can show this description as a plain text, but the web version can display it in html format.
Basically, file MYContainer.json is just used for web version because the user is not allowed to query the file and folder structure of a network address for security issue. This file, declares the sub-folders (categories) it has, is in the main folder of each container and will be generated automatically when you are at the Main Page of this Windows App. Although this App does not use this file at this moment, it is useful for its web version.
Originally, the file MYCategory.json in each category folder is just for web version. However, it is hard to set a card's information such as position, size, etc. just in file name or its content. These information have been declared in this MYCategory.json file now. You can provide these information from of so you don't need to write this file directly now. If you want to edit it by yourself, you can get its concept fromhttps://github.com/ychsue/MemorizeYC.Web/blob/master/MemorizeYC.Web/Models/MYCategoryJson.ts.
Originally, the file MYCategory.json in each category folder is just for web version. However, it is hard to set a card's information such as position, size, etc. just in file name or its content. These information have been declared in this MYCategory.json file now. You can provide these information from of so you don't need to write this file directly now. If you want to edit it by yourself, you can get its concept fromhttps://github.com/ychsue/MemorizeYC.Web/blob/master/MemorizeYC.Web/Models/MYCategoryJson.ts.